
Creating a professional email address for your domain is one of the most important steps to build credibility online. Instead of relying on free providers like Gmail or Yahoo, you can easily create name@yourdomain.com using your hosting control panel. This guide explains how to create an email account in cPanel, the standard control panel provided with Razorhost hosting.

Why Use a Domain-Based Email Address?
Before diving into the process, let’s understand why a domain email is essential:
- Professional Image – A domain-based email looks more trustworthy than a free account.
- Brand Consistency – Every communication promotes your business identity.
- Better Deliverability – Domain emails reduce the chances of landing in spam folders.
- Full Control – You manage storage, security, and access directly from your hosting account.
Step-by-Step Guide to Create Email Address in cPanel
Step 1: Log in to cPanel
First, sign in to your hosting cPanel dashboard. Razorhost provides an easy one-click login through the client area. Once inside, look for the Emails section.
Step 1 − Click on the Email Accounts link found in your Emails section of the cPanel Home.
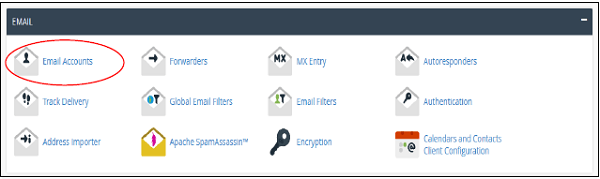
Step 2: Open Email Accounts
Inside the Email Accounts option, you will see a panel where you can manage, view, and add accounts. Look for the Add Email Account button at the top of the page.
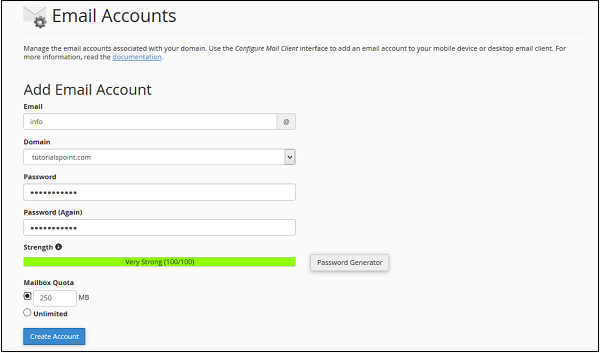
Step 3: Enter Your Email Name
Now, you can choose the email name you want. For example, if your business domain is example.com and you want an email for sales, type “sales” in the box. The full email will be sales@example.com. You can create multiple accounts such as info@, support@, or yourname@ depending on your needs.
Step 4: Set a Strong Password and Mailbox Quota
Every email account must have a secure password. Avoid using simple phrases like “12345” or “password.” Instead, use a combination of uppercase, lowercase, numbers, and special characters.
Next, assign a Mailbox Quota. This defines how much disk space the account can consume. For example:
- Specific Size – Set a limit in MB (e.g., 500 MB).
- Unlimited – Allow the account to use all available hosting space.
Step 5: Create the Account
Finally, click on the Create Account button. Your new domain email address is now active. You will see it listed under “Email Accounts,” where you can manage passwords, storage, or access webmail.
How to Access Your Domain Email
After creating your account, you can send and receive emails through multiple methods:
- Webmail – Access via cPanel → Webmail (works from any browser).
- Email Client – Configure apps like Outlook, Thunderbird, or Apple Mail.
- Mobile Devices – Use IMAP or POP settings to sync with Gmail or phone mail apps.
Best Practices for Managing Domain Emails
To ensure smooth usage, follow these tips:
- Regularly delete old or unused messages to save space.
- Enable SSL/TLS for secure communication.
- Use email filters to organize inbox efficiently.
- Back up important emails using cPanel backup tools.
Common Issues and Solutions
- Login errors – Double-check the full email address and password.
- Mailbox full – Increase quota or delete old messages.
- Email not received – Verify DNS records (MX, SPF, DKIM) are properly set for your domain.
Conclusion
Setting up a domain email address in cPanel takes only a few minutes but adds immense value to your business. With Razorhost hosting, you can create unlimited email accounts, manage storage quotas, and integrate with webmail or third-party clients. A branded email address like yourname@yourdomain.com not only improves professionalism but also ensures better communication with clients and customers.